


Table of Content:
1 Introduction
1.1 Foreword
1.2 Company Info
1.3 Trademarks
2 Overview
2.1 Overview
3 Safety
3.1 Recognize Safety Information
3.2 Understand Signal Words
3.3 Follow Safety Instructions
3.4 Prepare for Emergencies
3.5 Wear Protective Clothing
3.6 Protect Against Noise
3.7 Handle Fuel Safely?Avoid Fires
3.8 Handle Starting Fluid Safely
3.9 Fire Prevention
3.10 In Case of Fire
3.11 Avoid Static Electricity Risk When Refueling
3.12 Keep ROPS Installed Properly
3.13 Use Foldable ROPS and Seat Belt Properly
3.14 Stay Clear of Rotating Drivelines
3.15 Use Steps and Handholds Correctly
3.16 Read Operator?s Manuals for ISOBUS Controllers
3.17 Use Seat Belt Properly
3.18 Operating the Tractor Safely
3.19 Avoid Backover Accidents
3.20 Limited Use in Forestry Operation
3.21 Operating the Loader Tractor Safely
3.22 Keep Riders Off Machine
3.23 Instructional Seat
3.24 Use Safety Lights and Devices
3.25 Transport Towed Equipment at Safe Speeds
3.26 Use Caution on Slopes, Uneven Terrain, and Rough Ground
3.27 Freeing a Mired Machine
3.28 Avoid Contact with Agricultural Chemicals
3.29 Handle Agricultural Chemicals Safely
3.30 Handling Batteries Safely
3.31 Avoid Heating Near Pressurized Fluid Lines
3.32 Remove Paint Before Welding or Heating
3.33 Handle Electronic Components and Brackets Safely
3.34 Practice Safe Maintenance
3.35 Avoid Hot Exhaust
3.36 Clean Exhaust Filter Safely
3.37 Work In Ventilated Area
3.38 Support Machine Properly
3.39 Prevent Machine Runaway
3.40 Park Machine Safely
3.41 Transport Tractor Safely
3.42 Service Cooling System Safely
3.43 Service Accumulator Systems Safely
3.44 Service Tires Safely
3.45 Service Front-Wheel Drive Tractor Safely
3.46 Tightening Wheel Retaining Bolts/Nuts
3.47 Avoid High-Pressure Fluids
3.48 Do Not Open High-Pressure Fuel System
3.49 Store Attachments Safely
3.50 Decommissioning ? Proper Recycling and Disposal of Fluids and Components
4 Safety Signs
4.1 Replace Safety Signs
4.2 Operator’s Manual
4.3 Use Seat Belt Properly
4.4 Independent-Link Suspension (ILS) Front Axle Cylinders (If Equipped)
4.5 Independent-Link Suspension (ILS) Front Axle Accumulators (If Equipped)
5 Controls and Instruments
5.1 Front Console
5.2 CommandARM Controls
5.3 Climate Control, Radio, and Auxiliary Lighting Buttons (If Equipped)
5.4 CommandARM? ISOBUS Shortcut Button (ISB)
5.5 Right-Hand Side Console
5.6 Upper Right-Hand Side Console
5.7 Hitch Remote Control Switches
5.8 Key Switch
5.9 Corner Post Display
5.10 Information Indicators
5.11 Revolution Counter, Ground Speed, Transmission, and Set Speed
5.12 Coolant Temperature and Fuel Level Indicators
6 CommandCenter
6.1 Onscreen Help
6.2 Generation 4 CommandCenter?
6.3 Generation 4 CommandCenter? Processor
6.4 Run Page Structure
6.5 Menu
6.6 Machine Settings Overview
6.7 Operate System Applications Overview
6.8 Agricultural Management Solutions (AMS) Applications Overview
6.9 CommandCenter? Premium Activation
6.10 Demo Activations
6.11 Automation Status Overview
6.12 Navigate Generation 4 CommandCenter
6.13 Power Display On and Off
6.14 Clean CommandCenter Display
6.15 Navigate Run Pages on Main Page
6.16 Shortcut Buttons
6.17 Navigate to Display & Sound
6.18 Display & Sound
6.19 Brightness
6.20 Sound
6.21 Multiple Displays
6.22 Display Calibration
6.23 Navigate to Date & Time
6.24 Date & Time Application
6.25 Change Current Date
6.26 Change Current Time
6.27 Navigate to Language & Units
6.28 Language & Units
6.29 Language & Units Settings
6.30 Change Pages and Values
6.31 Status Center
6.32 Navigate to Software Manager
6.33 Software Manager
6.34 Factory and Service ADVISOR Installed Onscreen Help
6.35 Update Display Software
6.36 Activations
6.37 Service ADVISOR Remote
6.38 Vehicle Reprogramming
6.39 Troubleshooting – Reprogramming
6.40 System Recovery
6.41 Navigate to File Manager
6.42 File Manager
6.43 USB Drive
6.44 Capture Screen Shots
6.45 Navigate to Diagnostics Center
6.46 Diagnostics Center
6.47 Controller Diagnostics
6.48 Diagnostic Information
6.49 Hide Diagnostic Center
6.50 Diagnostic Trouble Codes
6.51 Readings
6.52 CAN Bus Information
6.53 CAN Bus Values
6.54 Network
6.55 Navigate to Users & Access
6.56 Users & Access
6.57 User Profiles
6.58 Access Groups
6.59 Navigate to Layout Manager
6.60 Layout Manager
6.61 Active Set
6.62 Shortcut Bar
6.63 All Run Pages
6.64 Add, Edit, or Duplicate Run Pages
6.65 Navigate to Fields
6.66 Fields
6.67 Manage Clients, Farms, and Fields
6.68 AutoTrac Guidance
6.69 Navigate to Machine Profile
6.70 Machine Profile
6.71 Navigate to Equipment Manager
6.72 Equipment Manager
6.73 Implement Profile
6.74 Navigate to Machine Monitor
6.75 Machine Monitor
6.76 Navigate to Work Monitor
6.77 Work Monitor
6.78 Work Recording
6.79 Navigate to Maintenance & Calibrations
6.80 Maintenance & Calibrations
6.81 Calibrations
6.82 Service Intervals
6.83 Service Checks
6.84 Automation Status
6.85 Read ISOBUS Controller?s Operator?s Manual
6.86 ISOBUS VT
6.87 StarFire GPS Receiver
6.88 Use Video Display Capability Properly
6.89 Install Video Display Camera
6.90 Navigate to Video Application
6.91 Video
6.92 Video Triggers
7 Operate the Radio (If Equipped)
7.1 Use Premium Radio
7.2 Select Radio Receiver Wave Band
7.3 Federal Communications Commission (FCC) Bluetooth Information
7.4 Turn Confirmation Beep On/Off (BEEP)
7.5 Adjust Maximum Volume at Power-On (ONVOL)
7.6 Program Type (PTY)
7.7 Treble Reduction During Interference (HCUT)
7.8 Set Key Function (KEY PRG)
7.9 SiriusXM Radio?General Information
7.10 Display XM Serial Number
7.11 External Sources (Premium Radio)
7.12 Select Radio Source with Generation 4 CommandCenter
7.13 AM, FM, and Weather Channel Home Page
7.14 Premium Radio CD Home Page
7.15 Premium Radio XM Home Page
7.16 Premium Radio USB Home Page
7.17 Premium Radio Bluetooth Home Page (If Equipped)
7.18 Auxiliary Home Page
7.19 Phone Operation
7.20 Contact List
7.21 Recent Calls
7.22 Pair Bluetooth? Device to Generation 4 CommandCenter?
8 Lights
8.1 Lights Identification
8.2 Light Switch
8.3 Configurable Lights
8.4 Exit Lights
8.5 Operate Turn Signals and High/Low-Beam
8.6 Safety Lights and Devices
8.7 CommandARM Light Buttons
8.8 Hazard Lights and Extremity Warning Lights
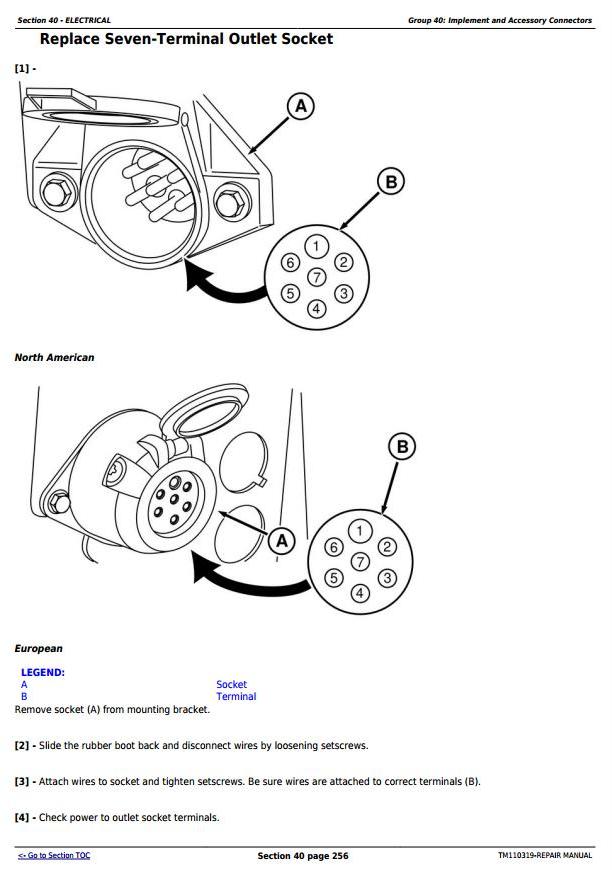
8.9 7-Pin Outlet
9 Operator’s Station
9.1 Roll-Over Protective Structure (ROPS)
9.2 Manual Storage Compartment
9.3 Use the Seat Belt
9.4 Cab Door
9.5 Cab Window
9.6 Rear View Mirror
9.7 Outside Mirrors
9.8 Pull-Down Sunshade
9.9 Adjust ComfortCommand Seat
9.10 Operator Presence Sensor
9.11 Instructional Seat
9.12 Adjust CommandARM Position
9.13 Adjust Steering Wheel and Column
9.14 Horn
9.15 HVAC (Heater/Ventilation/Air-Conditioning System) Settings?Generation 4 CommandCenter
9.16 Operate the Front Windshield Wiper and Windshield Washer
9.17 Operate the Rear Windshield Wiper and Windshield Washer
9.18 Install Business Band or Citizens Band (CB) Radio and Antenna
9.19 Auxiliary Power Outlet Sockets
9.20 Convenience Outlet
9.21 Connect Compatible Electronic Equipment
9.22 Configure Tractor for GPS/Radar
9.23 Install StarFire Receiver
9.24 Install GreenStar System Components
9.25 Connect AutoTrac Assisted Steering System
9.26 Machine Sync
9.27 Monitor Bracket Mounts
9.28 Position Left-Hand Side Steps
10 Prestarting Checks
10.1 Comply with Operator’s Manuals of Implement Manufacturers
10.2 Check Engine Oil Level
10.3 Check the Transmission/Hydraulic Oil System Level
10.4 Drain Primary and Secondary Fuel Filter
10.5 Lubricate U-Joints?1500 Series Front Axle
10.6 Lubricate U-Joints?ILS (Independent-Link Suspension) Front Axle
10.7 Lubricate 1500 Series Front Axle
10.8 Lubricate ILS (Independent-Link Suspension) Front Axle
10.9 Clean the Air Intake Duct Drain Valve
11 Operating the Engine
11.1 Start Only From Operator’s Seat
11.2 Engine Fuel System and Power Rating
11.3 Engines with Turbocharger
11.4 Battery Disconnect Switch
11.5 Start the Engine
11.6 Run the Engine
11.7 Engine Speed
11.8 Stop the Engine
11.9 Restart Engine That Has Run Out of Fuel
11.10 Reduce Fuel Consumption
11.11 Use Battery Booster or Charger
11.12 Never Attempt to Start the Tractor by Towing It
12 Operating the Tractor
12.1 Avoid Contact with Agricultural Chemicals
12.2 Operator Need to be Trained
12.3 Keep Operator Station Window and Door Closed
12.4 Be Careful on Descents
12.5 Use the Seat Belts
12.6 Use Emergency Exit
12.7 Change Tire Size
12.8 Activate and Set FieldCruise
12.9 Use FieldCruise with Different Transmission Modes
12.10 Operate the Independent-Link Suspension (ILS) Front Axle (If Equipped)
12.11 Differential Lock
12.12 Change Differential Lock Disengagement Steering Angle
12.13 Mechanical Front-Wheel Drive (MFWD)
12.14 Change Mechanical Front-Wheel Drive (MFWD) Disengagement Steering Angle
12.15 Use AutoClutch (If Equipped)
12.16 Brakes Operation
12.17 Emergency Brake Operation (Manual Mode)
12.18 Come Home Mode
13 Operating the PowerShift Transmission?16-Speed
13.1 Operate the Transmission?16-Speed PowerShift
13.2 Shift the Transmission
13.3 Set Startup Gear and RPM Variation
13.4 Operate Automatic PowerShift (APS)
14 Operating the e23 Transmission
14.1 Operate e23 Transmission with Right-Hand Side Reverser
14.2 Shift e23 Transmission with Right-Hand Side Reverser
14.3 Set Startup Gears
14.4 CommandCenter Transmission Main Page
14.5 Efficiency Manager on the e23 Transmission
14.6 Efficiency Manager on e23 Transmission in Manual Mode
14.7 Custom Transmission Settings
15 Break-In Period
15.1 Perform Break-In Period Checks
15.2 Use Wheel and Wheel Weight Screw Tightening Auxiliary Stand
15.3 Use Wheel Torque Wrench Adapter
15.4 Tighten Wheel Weight Screws
15.5 Tighten Front Wheel Screws
15.6 Tighten Rear Drive Wheel-to-Cast Hub Screws
15.7 Tighten Rear Steel Wheel-to-Hub Screws
15.8 Tighten Rear Steel Wheels?Cast Hub Screws
15.9 Tighten Rear Wheel Screws?Heavy-Duty Cast with 10-Screw Hubs
15.10 Check Engine Oil Level
15.11 Check the Transmission/Hydraulic Oil System Level
15.12 Lubricate U-Joints?1500 Series Front Axle
15.13 Lubricate U-Joints?ILS (Independent-Link Suspension) Front Axle
15.14 Lubricate 1500 Series Front Axle
15.15 Lubricate ILS (Independent-Link Suspension) Front Axle
15.16 Inspect Tires
15.17 Lubricate Three-Point Rear Hitch (If Equipped)
15.18 Drain Primary and Secondary Fuel Filter
15.19 Check Coolant Level
15.20 Change Engine Oil
15.21 Replace Engine Oil Filter
15.22 Check ILS Front Axle Accumulator Pre-Charge Pressure (If Equipped)
16 Intelligent Total Equipment Control (iTEC)
16.1 CommandARM Control Functions
16.2 CommandCenter Pages Descriptions and Functions
16.3 Status Area
16.4 Set Up A Sequence
16.5 Sequence Step Status
16.6 Execute Sequence
16.7 Delete Sequence
17 Tractor Implement Automation (TIA)
17.1 Tractor Implement Automation (TIA)
17.2 Activate Tractor Implement Automation Equipment
17.3 Tractor Implement Automation (TIA)?Status Page
17.4 Operate Tractor Implement Automation
17.5 Power Take-Off (PTO) Requirements
17.6 Selective Control Valve (SCV) Requirements
17.7 AutoTrac Guidance Requirements
17.8 Rear Hitch Requirements
18 TouchSet Depth Control
18.1 Attach Implement and Control System
18.2 Use TouchSet Depth Controls
19 Pick-Up Hitch and Three-Point Rear Hitch (If Equipped)
19.1 Matching Tractor Power to Towed Implement
19.2 Pickup Hitch and Three-Point Rear Hitch Components (If Equipped)
19.3 Hitch Remote Control Switches (If Equipped)
19.4 Rear Hitch
19.5 Hitch Control Lever
19.6 Lock and Damping
19.7 Adjust Load Depth Control (Draft Response)
19.8 Use Position Control
19.9 Draft Control Use
19.10 Adjust Rear Hitch Upper Limit
19.11 Adjust Rear Hitch Drop Rate
19.12 Adjust Rear Hitch Raise Rate
19.13 Rear Hitch Slip Sensitivity
19.14 Float Operation
19.15 Hitch Manual Lowering
19.16 Correct Center Link Position
19.17 Adjust Sway Blocks
19.18 Attach Implement to Quick Coupler
19.19 Adjust Implement Level
19.20 Change Lateral Float
19.21 Detach Implement from Quick Coupler
19.22 Hitch Conversion?Convertible Quick-Coupler
19.23 Convert Category 4N Convertible Quick Coupler Lower Hooks
19.24 Convert Category 3/4N Convertible Quick Coupler Upper Hooks
20 Selective Control Valves (SCV)
20.1 Configure Selective Control Valves?Access to Settings
20.2 Configure Selective Control Valves?Standard Mode
20.3 Activate Independent Mode
20.4 Configure Selective Control Valves?Independent Mode
20.5 Configure Selective Control Valves?Feature Mode
20.6 Selective Control Valves Total Flow Rate
20.7 Use Six Position SCV Control Levers
20.8 SCV Control Lever?Neutral Position
20.9 SCV Control Lever?Extend and Extend Detent Position
20.10 SCV Control Lever?Retract and Retract Detent Position
20.11 SCV Control Lever?Float Position
20.12 Operator Presence Sensor
20.13 Hydraulic Component Identification
20.14 Connect Hydraulic Hoses?Rear of Tractor
20.15 Disconnect Hydraulic Hoses?Rear of Tractor
20.16 Use Load-Sensing Hydraulic System?Power-Beyond
20.17 Examples of Use Hydraulic System with Load Sensor?Power Beyond?
20.18 Use Hydraulic Spray Pumps
20.19 Implement Connection, Example 1?Pressure Control Valve Applications (Grain Drills or Air Seeders with Constant Down-Pressure System)
20.20 Implement Connection, Example 2?Motor Application Using Motor Case Drain
20.21 Implement Connection, Example 3?Motor Application Using SCV Retract and Auxiliary Motor Return
20.22 Implement Connection, Example 4?Planter with Vacuum Motor and Return Line to SCV Using Motor Return Tip
20.23 Implement Connection, Example 5?Planter with Vacuum Motor, Return Line to Motor Return and Lift Assist
20.24 Implement Connection, Example 6?Planter with Vacuum Motor and Return Line to Motor Return
20.25 Use Hydraulic Motor Return
20.26 Use Hydraulic Motor Case Drain
20.27 Use Implement Requiring Large Volumes of Oil
21 Power Take-Off (PTO)
21.1 Stay Clear of Rotating Drivelines
21.2 Power Take-Off Instructions (PTO)
21.3 Coupling Implements Driven by Power Take-Off
21.4 Power Take-Off Speed
21.5 Operate Power Take-Off
21.6 Select PTO Cruise Speed
21.7 Fine Adjustment to PTO Cruise Speeds
21.8 PTO Engagement Rate
22 Drawbar
22.1 Use Drawbar Correctly
22.2 Drawbar Vertical Load Limits
22.3 Adjust Drawbar Side-to-Side
22.4 Adjust Drawbar Height
22.5 Coupling Implements to Drawbar
23 Front Wheels, Tires, and Tread
23.1 Safely Mounting Tires
23.2 Tire Parts
23.3 Tire Denomination
23.4 Tire Tread Types
23.5 Tire Inflation Pressure Norms
23.6 Inflation Pressure
23.7 Tire Combinations
23.8 Select Tire Combinations
23.9 Recommended Front Tire Pressures
23.10 Tighten Front Wheel Screws
23.11 Install Double Front Wheel Extensions (If Equipped)
23.12 Steering Stop Settings?Independent-Link Suspension
23.13 Check Toe-In
23.14 Adjust Toe-In?1500 MFWD Axle
23.15 Adjust Toe-In?Independent-Link Suspension
23.16 MFWD Steering Stop Settings
23.17 Fender Settings?1500 MFWD and Independent-Link Suspension
23.18 Determine Rim Type?Front Tires
23.19 Four-Position Wheel Settings
23.20 Wheel Settings?8-Position
23.21 Explanation of Front Tire, Steering Stop, and Fender Settings Table
23.22 Front Tire, Fender, and Steering Stop Settings?1500 Series Front Axle
23.23 Front Tire, Fender, and Steering Stop Settings?ILS Front Axle
23.24 Twin Front Tire, Fender, and Steering Stop Settings?ILS Front Axle
24 Rear Wheels, Tires, and Tread
24.1 Safely Mounting Tires
24.2 Tire Parts
24.3 Tire Denomination
24.4 Tire Tread Types
24.5 Tire Inflation Pressure Norms
24.6 Inflation Pressure
24.7 Tire Combinations
24.8 Select Tire Combinations
24.9 Use Wheel and Wheel Weight Screw Tightening Auxiliary Stand
24.10 Use Wheel Torque Wrench Adapter
24.11 Recommended Rear Tire Inflation Pressures
24.12 Rear Wheel, Tire, and Tread Guidelines
24.13 Install Rear Drive Wheel on Cast Hub
24.14 Install Dual Wheel on Hub
24.15 Rear Drive Wheel with Standard Hubs?Adjust and Tighten
24.16 Rear Dual Wheels with Standard Hubs?Adjust and Tighten
24.17 Rear Drive and Dual Wheels With Heavy-Duty Hubs?Adjust and Tighten
24.18 Rear Drive Wheel Tread Settings for Single Wheels
24.19 Rear Dual Wheel Tread Settings?520 Tires, 3015 mm (118.5 in) Axle
24.20 Rear Double-Tread Setting?710 and 800 Tires, 3015 mm (118.5 in) Axle
24.21 Extension Mount?800 Tires, 3015 mm (118.5 in) Axle
25 Ballasting
25.1 Ballasting Optimization?Select the Correct Weights
25.2 General Ballasting Information
25.3 General Guidelines for Ballasting in Field Operations
25.4 Controll Power Hop?MFWD Tractors
25.5 General Weight Split Guidelines
25.6 Ballasting Suggestions for Specific Types of Implements
25.7 Determine Ballasted Tractor Weight, Weight Split, Axle Loads, and Required Tire Inflation Pressures
25.8 Tractor Unballasted Weight Chart
25.9 Maximum Load per Wheel
25.10 Worksheet to Calculate Ballast Changes
25.11 Use Front Weights
25.12 Use Wheel Weights
25.13 Ballasting Tires with Water
25.14 Emptying Tires With Liquid Ballast
25.15 Liquid Ballast Use
25.16 Implement Codes
25.17 Weight Added to Rear Axle with Hitch-Mounted Implements
25.18 Measure Wheel Slip?Manually
26 Transport Tractor
26.1 Drive Tractor on Roads
26.2 Transport with Ballast
26.3 Tow Loads
26.4 Use a Safety Chain
26.5 Tow Mode
26.6 Tow Tractor
26.7 Freeing a Mired Machine
26.8 Transport on Flat-Bed Carrier
27 Tractor Storage
27.1 Using High Pressure Washers
27.2 Using Compressed Air
27.3 Place Tractor in Storage
27.4 Remove Tractor from Storage
27.5 Paint Finish Care
28 Access the Service Points
28.1 Access the Engine Compartment
28.2 Access the Engine Compartment?Hood with Lock
28.3 Remove and Install Engine Side Shields
28.4 Access Alternator Belt
28.5 Access the Batteries
28.6 Access the Fuses and Relays
29 Fuels and Coolant
29.1 Engines with Tier 3-Stage IIIA/MAR-I Emission Control
29.2 Diesel Fuel
29.3 Lubricity of Diesel Fuel
29.4 Handling and Storing Diesel Fuel
29.5 Supplemental Diesel Fuel Additives
29.6 Biodiesel Fuel
29.7 Testing Diesel Fuel
29.8 Minimizing the Effect of Cold Weather on Diesel Engines
29.9 Fill Fuel Tank
29.10 Fuel Filters
29.11 Types of Diesel
29.12 Diesel Engine Coolant (Engine with Wet Sleeve Cylinder Liners)
29.13 Operating in Warm Temperature Climates
29.14 Water Quality for Mixing with Coolant Concentrate
29.15 Testing Coolant Freeze Point
30 Lubricants?8245R Tractor
30.1 Diesel Engine Break-In Oil ? Non-Emissions Certified and Certified Tier 1, Tier 2, Tier 3, Stage I, Stage II, and Stage III
30.2 Diesel Engine Oil ? Tier 2 and Stage II
30.3 Engine Oil and Filter Service Intervals ? Tier 2 and Stage II Engines
30.4 Mixing of Lubricants
30.5 Transmission and Hydraulic Oil
30.6 Oil Filters
30.7 PowerShift Transmission Recalibration
30.8 MFWD Axle Housing Oil
30.9 Final Drive Oil
30.10 Multipurpose Extreme Pressure (EP) Grease
30.11 Alternative and Synthetic Lubricants
30.12 Lubricant Storage
31 Lubricants?8270R and 8295R Tractors
31.1 Engines with Tier 3-Stage IIIA/MAR-I Emission Control
31.2 Diesel Engine Break-In Oil ? Non-Emissions Certified and Certified Tier 1, Tier 2, Tier 3, Stage I, Stage II, and Stage III
31.3 Diesel Engine Oil ? Tier 2 and Stage II
31.4 Engine Oil and Filter Service Intervals ? Tier 2 and Stage II Engines
31.5 Diesel Engine Oil ? Tier 3 and Stage IIIA
31.6 Engine Oil and Filter Service Intervals ? Tier 3 and Stage IIIA ? PowerTech Plus Engines
31.7 Mixing of Lubricants
31.8 Transmission and Hydraulic Oil
31.9 Oil Filters
31.10 PowerShift Transmission Recalibration
31.11 MFWD Axle Housing Oil
31.12 Final Drive Oil
31.13 Independent-Link Suspension Differential Case Oil
31.14 Multipurpose Extreme Pressure (EP) Grease
31.15 Alternative and Synthetic Lubricants
31.16 Lubricant Storage
32 Lubricants?8320R and 8345R Tractors
32.1 Engines with Tier 3-Stage IIIA/MAR-I Emission Control
32.2 Diesel Engine Break-In Oil ? Non-Emissions Certified and Certified Tier 1, Tier 2, Tier 3, Stage I, Stage II, and Stage III
32.3 Diesel Engine Oil ? Tier 2 and Stage II
32.4 Engine Oil and Filter Service Intervals ? Tier 2 and Stage II Engines
32.5 Diesel Engine Oil ? Tier 3 and Stage IIIA
32.6 Engine Oil and Filter Service Intervals ? Tier 3 and Stage IIIA ? PowerTech Plus Engines
32.7 Mixing of Lubricants
32.8 Transmission and Hydraulic Oil
32.9 Oil Filters
32.10 PowerShift Transmission Recalibration
32.11 MFWD Axle Housing Oil
32.12 Final Drive Oil
32.13 Independent-Link Suspension Differential Case Oil
32.14 Multipurpose Extreme Pressure (EP) Grease
32.15 Alternative and Synthetic Lubricants
32.16 Lubricant Storage
33 Lubricants?8370R and 8400R Tractors
33.1 Engines with Tier 3-Stage IIIA/MAR-I Emission Control
33.2 Diesel Engine Break-In Oil ? Non-Emissions Certified and Certified Tier 1, Tier 2, Tier 3, Stage I, Stage II, and Stage III
33.3 Diesel Engine Oil ? Tier 2 and Stage II
33.4 Engine Oil and Filter Service Intervals ? Tier 2 and Stage II Engines
33.5 Diesel Engine Oil ? Tier 3 and Stage IIIA
33.6 Engine Oil and Filter Service Intervals ? Tier 3 and Stage IIIA ? PowerTech Plus Engines
33.7 Mixing of Lubricants
33.8 Transmission and Hydraulic Oil
33.9 Oil Filters
33.10 PowerShift Transmission Recalibration
33.11 Final Drive Oil
33.12 Independent-Link Suspension Differential Case Oil
33.13 Multipurpose Extreme Pressure (EP) Grease
33.14 Alternative and Synthetic Lubricants
33.15 Lubricant Storage
34 Maintenance and Service Intervals
34.1 Required Emission-Related Information
34.2 Clean Vehicle of Hazardous Pesticides
34.3 Important Considerations
34.4 Safe Maintenance and Cleaning
34.5 General Instructions Regarding the Condition of the Tractor
34.6 Using High Pressure Washers
34.7 Use Compressed Air
34.8 Service Interval Chart
34.9 Service?Break-In Period
34.10 Service?Daily or Every 10 Hours
34.11 Service?Weekly or Every 50 Hours
34.12 Service?Yearly
34.13 Service?Every 250 Hours
34.14 Service?Every 375 Hours
34.15 Service?Every 500 Hours
34.16 Service?Every 1000 Hours
34.17 Service?Every 2 Years or 1500 Hours
34.18 Service?Every 2 Years or 2000 Hours
34.19 Service?Every 4 Years or Every 4500 Hours
34.20 Service?Every 5 Years or 5000 Hours
34.21 Service?Every 6 Years or 6000 Hours
35 Service?As Required
35.1 Jack Up the Tractor?Lifting Points and Support Stand Placement
35.2 Service and Connect STC? (Snap-to-Connect) Fittings
35.3 Do Not Modify Fuel System
35.4 Service Interval?As Indicated
35.5 Clean Radiator, Oil Cooler, and A/C Condenser
35.6 Check Engine and Exhaust Compartments for Debris
35.7 Check Air Conditioning System
35.8 Replace Vari-Cool Fan Belt?Tier 2-Stage II Engine and 8270R, 8295R, 8320R, and 8345R Tractors with Tier 3-Stage IIIA Engine
35.9 Replace Vari-Cool Fan Belt?8370R and 8400R Tractors with Tier 3-Stage IIIA Engine
35.10 Replace Alternator Belt
35.11 Check Engine Drain Port?8370R and 8400R Tractors with Tier 3-Stage IIIA Engine
35.12 Replace the Transmission and Hydraulic System Oil Filter
35.13 Drain Fuel Tank Sump
35.14 Check Front Axle Differential Housing Oil Level 1500 Series Front Axle
35.15 Clean CommandCenter Display
35.16 Clean Primary Filter Element
35.17 Replace Engine Air Filters
35.18 Check Coolant Level
35.19 Drain Primary and Secondary Fuel Filter
35.20 Bleed Fuel System
35.21 Cab Fuse Box
35.22 Engine Fuse Box
35.23 Master Fuses
35.24 Service Implement Power Relay Module
35.25 Handle Halogen Light Bulbs Safely
35.26 Replace Front HID/LED Light Assembly
35.27 Replace Front Grille Halogen Light Bulbs
35.28 Adjust Front Grille Lights
35.29 Headlight Beam Adjustment
35.30 Replace Front, Side, and Rear Cab Roof Light Assembly
35.31 Replace Brake or Turn Signal Light Bulb
35.32 Replace Dome Light Bulb
35.33 Replace Courtesy Light Bulb
35.34 Replace Map Light Bulb
36 Service?Break-In Period
36.1 Maintenance of Break-In Period
36.2 Change Engine Oil
36.3 Replace Engine Oil Filter
36.4 Check Coolant Level
36.5 Check Cooling System
36.6 Check Air Intake System?Tier 2-Stage II Engine and 8270R, 8295R, 8320R, and 8345R Tractors with Tier 3-Stage IIIA Engine
36.7 Check Air Intake System?8370R and 8400R Tractors with Tier 3-Stage IIIA Engine
37 Service?Daily or Every 10 Hours
37.1 Check Engine Oil Level
37.2 Check the Transmission/Hydraulic Oil System Level
37.3 Lubricate U-Joints?1500 Series Front Axle
37.4 Lubricate U-Joints?ILS (Independent-Link Suspension) Front Axle
37.5 Lubricate 1500 Series Front Axle
37.6 Lubricate ILS (Independent-Link Suspension) Front Axle
37.7 Clean the Air Intake Duct Drain Valve
38 Service?Weekly
38.1 Inspect Tires
38.2 Lubricate Three-Point Rear Hitch (If Equipped)
39 Service?Yearly
39.1 Handling Batteries Safely
39.2 Service Batteries and Connections
39.3 Inspect Seat Belts
39.4 Change Engine Oil
39.5 Replace Engine Oil Filter
39.6 Replace Cab Fresh Air Filter
39.7 Replace Cab Recirculation Air Filter
39.8 Replace Engine Air Filters
39.9 Check ILS Front Axle Accumulator Pre-Charge Pressure (If Equipped)
39.10 Check Vari-Cool Fan Belt Drive and Wear
40 Service?Every 50 Hours
40.1 Inspect Tires
40.2 Lubricate Three-Point Rear Hitch (If Equipped)
41 Service?Every 250 Hours
41.1 Lubricate Three-Point Rear Hitch (If Equipped)
41.2 Check Neutral Start System?16-speed and e23 Transmissions
41.3 Check Transmission Park System
41.4 Check Front Axle Final Drive Housing Oil Level
41.5 Check Front Axle Differential Housing Oil Level 1500 Series Front Axle
41.6 Change Engine Oil
41.7 Replace Engine Oil Filter
41.8 Lubricate the ILS Front Axle Internal Tie Rod Ball Joints (If Equipped)
41.9 Lubricate 1500 Series Front Axle
41.10 Lubricate ILS (Independent-Link Suspension) Front Axle
41.11 Lubricate U-Joints?1500 Series Front Axle
41.12 Lubricate U-Joints?ILS (Independent-Link Suspension) Front Axle
42 Service?Every 375 Hours
42.1 Change Engine Oil
42.2 Replace Engine Oil Filter
43 Service?Every 500 Hours
43.1 Change Engine Oil
43.2 Replace Engine Oil Filter
43.3 Check Cooling System
43.4 Lubricate the Wet (Lubricated) Vari-Cool Fan Drive?Tier 2-Stage II Engine and 8245R, 8270R, 8295R, 8320R, and 8345R Tractors with Tier 3-Stage IIIA Engine
43.5 Lubricate the Wet (Lubricated) Vari-Cool Fan Drive?8370R and 8400R Tractors with Tier 3-Stage IIIA Engine
43.6 Check Vari-Cool Fan Belt Drive and Wear
43.7 Use Wheel and Wheel Weight Screw Tightening Auxiliary Stand
43.8 Use Wheel Torque Wrench Adapter
43.9 Tighten Wheel Weight Screws
43.10 Tighten Front Wheel Screws
43.11 Tighten Rear Drive Wheel-to-Cast Hub Screws
43.12 Tighten Rear Steel Wheel-to-Hub Screws
43.13 Tighten Rear Steel Wheels?Cast Hub Screws
43.14 Tighten Rear Wheel Screws?Heavy-Duty Cast with 10-Screw Hubs
43.15 Replace Primary and Secondary Fuel Filter?Tier 2-Stage II Engine and 8270R, 8295R, 8320R, and 8345R Tractors with Tier 3-Stage IIIA Engine
43.16 Replace Primary and Secondary Fuel Filter?8370R and 8400R Tractors with Tier 3-Stage IIIA Engine
43.17 Check Air Intake System?Tier 2-Stage II Engine and 8270R, 8295R, 8320R, and 8345R Tractors with Tier 3-Stage IIIA Engine
43.18 Check Air Intake System?8370R and 8400R Tractors with Tier 3-Stage IIIA Engine
43.19 Drain the Heavy-Duty Water Separator
43.20 Clean the Heavy-Duty Water Separator Element
43.21 Check the Drawbar Screw Torque
44 Service?Every 1000 Hours
44.1 Replace Cab Recirculation Air Filter
44.2 Replace Cab Fresh Air Filter
44.3 Clean the 1500 Series Front Axle Breather
44.4 Replace Engine Air Filters
44.5 Check ILS Front Axle Accumulator Pre-Charge Pressure (If Equipped)
45 Service?Every 2 Years or 1500 Hours
45.1 Replace Fuel Tank Vent Filter
45.2 Drain Differential
45.3 Drain 16-Speed PowerShift Transmission (PST) and Clean Filter
45.4 Drain e23 Transmissions and Clean Transmission Filter
45.5 Drain the ILS Front Axle Oil
45.6 Clean Hydraulic Oil Suction Screen
45.7 Change the Transmission/Hydraulic System Oil
45.8 Replace the Transmission and Hydraulic System Oil Filter
45.9 Change the Front Axle Final Drive Housing Oil
45.10 Change the 1500 Series Front Axle Differential Housing Oil
45.11 Lubricate Draft Link Support Shaft Bushing
45.12 Check Alternator Belt and Automatic Belt Tensioner
45.13 Change Pilot Oil Filter
46 Service?Every 2 Years or 2000 Hours
46.1 Adjust Engine Valve Clearance
46.2 Drain, Flush, and Refill Cooling System
46.3 Replace Vari-Cool Fan Drive Pulley Seals and Bushings
46.4 Replace Wear Parts of Dry Vari-Cool Fan Drive (If Equipped)
47 Service?Every 4 Years or 4500 Hours
47.1 Replace Vari-Cool Fan Drive Pulley Seals and Bushings
47.2 Replace Wear Parts of Dry Vari-Cool Fan Drive (If Equipped)
48 Service?Every 5 Years or 5000 Hours
48.1 Replace Engine Crankshaft Damper
48.2 Replace Transmission Torsional Damper
49 Service?Every 6 Years or 6000 Hours
49.1 Drain, Flush, and Refill Cooling System
50 Troubleshooting
50.1 Engine Troubleshooting
50.2 Transmission Troubleshooting
50.3 Hydraulic System Troubleshooting
50.4 Hitch Troubleshooting
50.5 Selective Control Valve Troubleshooting
50.6 TouchSet Depth Control Troubleshooting
50.7 Electrical System Troubleshooting
50.8 Operator’s Station Troubleshooting
50.9 Tractor Troubleshooting
50.10 Independent-Link Suspension Troubleshooting
50.11 Steering System Troubleshooting
50.12 Premium Radio Troubleshooting
51 Diagnostic Trouble Codes
51.1 STOP, Service Alert, and Information Indicators
51.2 Access Diagnostic Trouble Codes
52 Specifications
52.1 Engine Specifications?Tier 2-Stage II
52.2 Engine Specifications?Tier 3-Stage IIIA
52.3 Fuel System Specifications
52.4 Transmission Specifications
52.5 Ground Speeds?16-Speed PowerShift
52.6 Travel Speeds?e23 Transmission
52.7 Power Take-Off (PTO) Specifications
52.8 Drawbar Specifications
52.9 Electrical System Specifications
52.10 Hydraulic System Specifications
52.11 Front Axle Specifications
52.12 Rear Axle Specifications
52.13 Tire Combinations
52.14 Capacities
52.15 Weights
52.16 Dimensions
52.17 Identify Zinc-Flake Coated Screws
52.18 Unified Inch Bolt and Screw Torque Values
52.19 Metric Bolt and Screw Torque Values
53 Serial Numbers
53.1 Identification Plates
53.2 Keep Proof of Ownership
53.
